Recording Lynx tapes to PC using Audacity and PALETAPE

Key information on settings were found in PALETAPE documentation which I have documented here
Audacity is free software available from http://www.audacityteam.org/ and is very simple to install.
 |
| Fig 1 |
As mentioned above make sure you set mono recording
Secondly, in the bottom left corner, set the Project Rate to be 22050.
Set your tape player to the start point you need, hit the red record button on Audacity and then play on your cassette player. You will see the sound pattern being recorded until the end of the program. At this point use the yellow stop button on Audacity and stop your cassette player.
You may have to do this a few times, as you need to find the volume level on your cassette player that doesn't distort the recording. The indicator that your volume is too high is that the green bar for the mic input goes as far right as it can and the bar turns yellow. Once you have the volume right, start a new recording remembering the mono and project rate 22050 settings. Fig 1 shows the recording of Super Aid Raid. Make sure you save the project before moving on to edit the file.
In Fig 1. at the start of the stream you can see a background sync signal, then a short sudden spike, then another period of sync signal and then the main data stream until it abruptly stops after a final CRC and Execution Address signals. The first sudden spike is the 'program filename signal' and starts with hex "A5".
 |
| Fig 2 |
 |
| Fig 3 |
Using the "I" marker tool you need to remove all the signal prior to this "A5". You need to be precise with this as in Fig 2. You can drag the "I" to the left to select the signal to be deleted. Zoom in to make this easier.
 |
| Fig 4 |
 |
| Fig 5 |
 |
| Fig 6 |
At this point save the Audacity project as a new name (so as to keep the original unedited project in case you need to go back and start again).
 |
| Fig 7 |
 |
| Fig 8 |
Now that you have a RAW file, we need to convert it to the TAP format for Lynx. This is done with the PALE v8.5 emulator
 |
| Fig 9 |
This looks a little intimidating but follow these instructions and you should be able to achieve the conversion from RAW to TAP.
First in Fig 9 click the small TapeRead button to bring up a GUI for the command line PALETAPE utility.
 |
| Fig 10 |
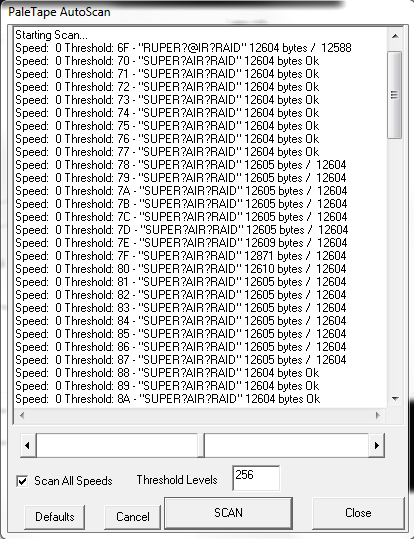
In Fig 10 select the Input RAW File from your final Audacity export, and set a filename for the Output TAP File. Ignore the other settings for now and click the AutoScan button.
 |
| Fig 11 |
 |
| Fig 12 |
Copy and paste the output in this window to notepad for use in the next step.
 |
| Fig 13 |
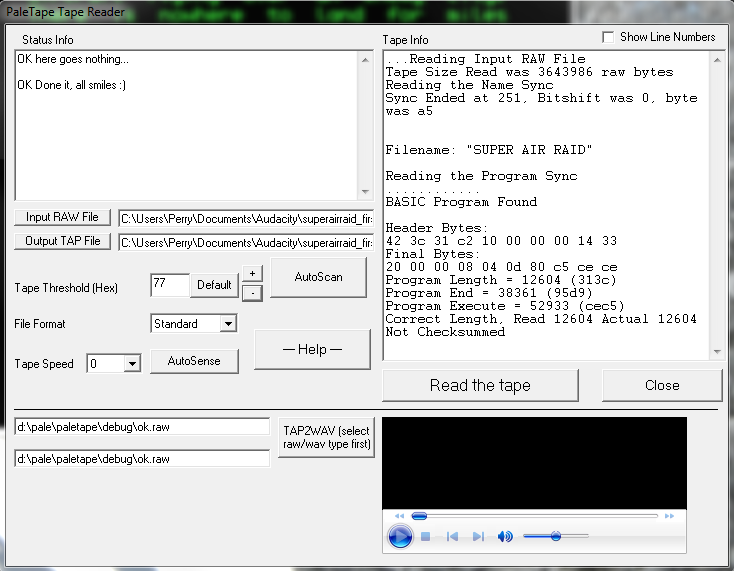
In Fig 13 now set Tape Threshold to the Threshold printed in the first line of Fig 12 (hence the need to copy it out to Notepad), File Format to Standard (despite the RAW file being header-less), and Tape Speed to the Speed printed in the first line of Fig 12 and click Read the tape button.
In the window above the Read the tape button, note the error "Wrong Length....". Keep checking this message as you click the "+" button. Even if the message changes to "Correct Length...." as in Fig 14 I found that keep clicking "+" so that Tape Threshold is as high as possible gave the best TAP output (lower levels resulted in TAP files that will not load in Jynx so trial and error is needed here). As you hit "+" you'll see that you will go from "Correct Length" to "Wrong Length", just hit "-" to move back the previous "Correct Length" Tape Threshold.
When happy, click Read the tape one last time and then Close. Your Output TAP File should now be written.
 |
| Fig 14 |
Comments
Post a Comment